


POPULAR CATEGORIES


WELCOME TO PMT ONLINE, THE UK'S BIGGEST GUITAR SHOP AND MUSIC STORE

13 LOCATIONS NATIONWIDE, OPEN 7 DAYS A WEEK
PMT BLOG
CELEBRATING 50 YEARS OF TAYLOR GUITARS
We delve into the story behind Taylor's journey from humble beginnings to world-renowned excellence, with a look at Taylor's iconic 50th anniversary models.
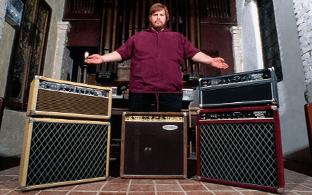
ALEXANDER “HOWARD” DUMBLE AND THE IMPACT OF DUMBLE AMPLIFIERS
Revered by legends like Eric Clapton and Stevie Ray Vaughan alike, we explore the timeless tone and lasting legacy that define the world of Dumble amplification.
FOO FIGHTERS GEAR GUIDE: HOW TO SOUND LIKE THE ARENA GIANTS
From the thundering riffs of Dave Grohl to the melodic undertones of Chris Shiflett, discover the instruments and equipment behind the iconic sound.
About PMT
PMT is an online music store and so much more. With 12 Experience Centres across the UK, our stores provide the ultimate space to try out instruments and equipment, learn, and get creative. We have more than 30 years of experience in matching musicians of all levels with their perfect instrument, and we’re on a mission to inspire and enable music lovers to Play Music Today.
We provide the best musical instruments and music gear from the biggest brands in the world - you can master your sound with the likes of Fender, Yamaha, Gibson, and Shure. From acoustic guitars to digital synthesizers, our Expert team is on hand to give you everything you need to find your dream piece of kit.